User Account
Account Registration
- Fill the registration form on the registration page. Select the appropriate Research Unit. If you need to register a Research Unit, please follow the step in research unit registration section.
- Accept the End User License Agreement using the checkbox
- Complete the Captcha
- Submit
- The Administrator of the Research Unit receive your request and has to process it. This is a manual processes. Please allow up to 7 days for this step.
- You will receive an email with your login credentials consisting of the email used for registration and an initial password. Follow the instruction in the password change section to change the initial password
Account setup
Go to MySMIR > Account & Settings to check your profile. Please consider adding a recovery email.
- Title
- Firstname
- Lastname
- Recovery email
Account deletion
For now, use the ticket system to request a deletion: Include the exact same information from your profile in the ticket.
- Title
- Firstname
- Lastname
- Recovery email
- Username
I can't login to my account
Locked account
Description: After 5 failed login atemps, your account will be locked for 10 minutes
Solution: You can try again after waiting 10 minutes
Disabled account
Description: In case of missbehavior or similar reasons, the SMIR team can disable account.
Solution: Contact us using our ticket system
Description: You have lost your last Research Unit membership
Solution: Contact us using our ticket system
Invalid credentials
Description: I forgot my password
Solution: You can reset your password. Read the password reset section for instructions.
Password change
The password can be changed on the MySMIR > Account & Settings page. See the password policy section to create a valid password.
Password policy
The password has to fullfil these criterias to be valid:
- Length must be between 8 and 12 characters
- It must contain 1 number (0-9)
- It must contain 1 lower case character
- It must contain 1 upper case character
- It must contain 1 special character
( ? } { $ - . , ; : ! ] [ )
Password reset
- Use the password recovery page to reset your lost password.
- A link to create a new password will be sent to both the registration email and the recovery email. Follow this link to create a new password according to the password policy
Research Unit
Research Units are the organisational units on SMIR. The are administrated by a Research Unit Administratior. Member of a Research Unit have access to a shared group folder. Every user is member of a least one Research Unit and can be members
Research Unit Administrator
The Research Unit Administrator can
- Accept join request
- Deny join request
- Remove users from a group
- Request be remove from as Research Unit Administrator
Accept or reject request
The email informs you that a user requested to be part of a research unit/group where you are the research unit administrator. This request is pending until you login to your SMIR account and accept/reject the user
- Login to your VSD account
- MySMIR > Group Administration
- Accept or reject a user using the respective buttons
Change Administrator
Please use the ticket system to request a Research Unit Administrator change.
Research Unit Registration
- Fill the online registration formular. Make sure to accurately fill the fields, including an accessable website. If you fail to do so your request will not be processed.
- Wait for the SMIR Admin to check your submission and to setup your Research Unit. This is a manual process and can take up to 7 days.
- You will receive an email once the Research Unit has been created.
- Next
- If you do not have an account on SMIR, please continue with the description in the user registration section
- If you already have an account on SMIR, please follow the instruction in the join a research unit
Join a Research Unit
- Login
- Go to MySMIR > Group Administration: Group Membership
- In the Group Management section klick on the
Join another Research Unitbutton and select the Research Unit from the drop-down menu
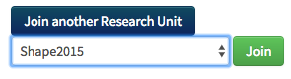
- Press join to send the join request to the administrator of the Research Unit
- Allow up to 7 days for the request to be processes by the administrator.
Request Research Unit deletion
Please use the ticket system to request a Research Unit deletion. Only Research Unit Administrators can request deletion of their Research Unit.
User administration
- Login
- Go to MySMIR > Group Administration: Research Unit Administration
- You find a list of Research Units you administer and open request
- And the list of Research Units members: Click on
History v
Virtual Groups
A user can create and manage Virtual Groups. This can be used to easily apply permission to a custom set of users. User cannot apply to a Virtual Group. Only the creator of the Virtual Group can add and remove users. Hence, Virtual Group are not shown in the list of Research Units (e.g. in the registration formular)
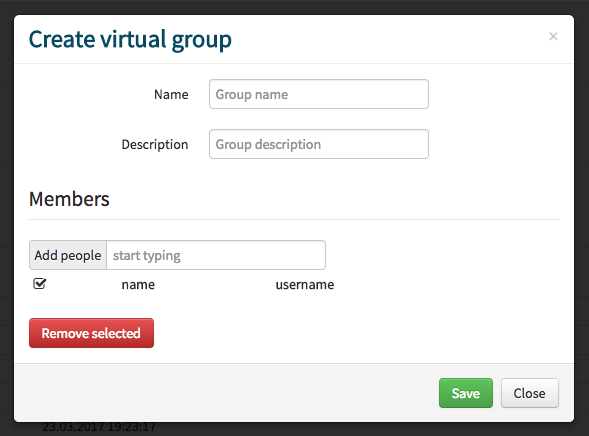
Create virtual group
- Login
- Go to MySMIR > Group Administration: Virtual Group Administration
- Click on
Create Group - Fill the
- Name
- Description
- Members: Search and add users
- Save to create the new group
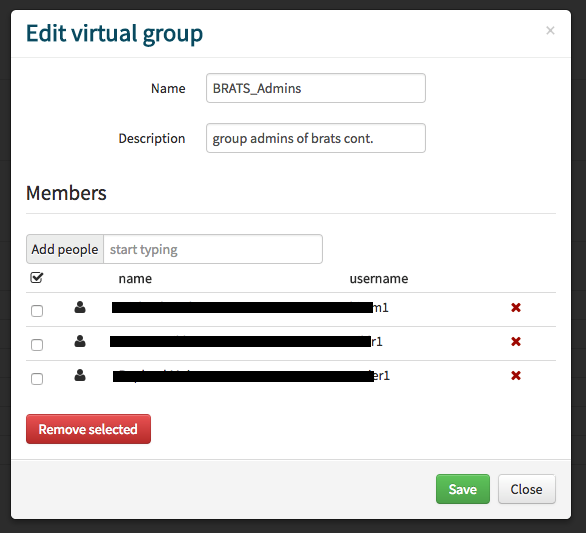
Manage virtual group
- Login
- Go to MySMIR > Group Administration: Virtual Group Administration
- Open the edit modal to manage the Virtual Group by clicking on the menu

- Edit
- Name
- Description
- Search and add users
- Remove users
- Save to finish
Upload
Web Upload
Restriction: 2 GB filesize
API
for large files use the API
Objects
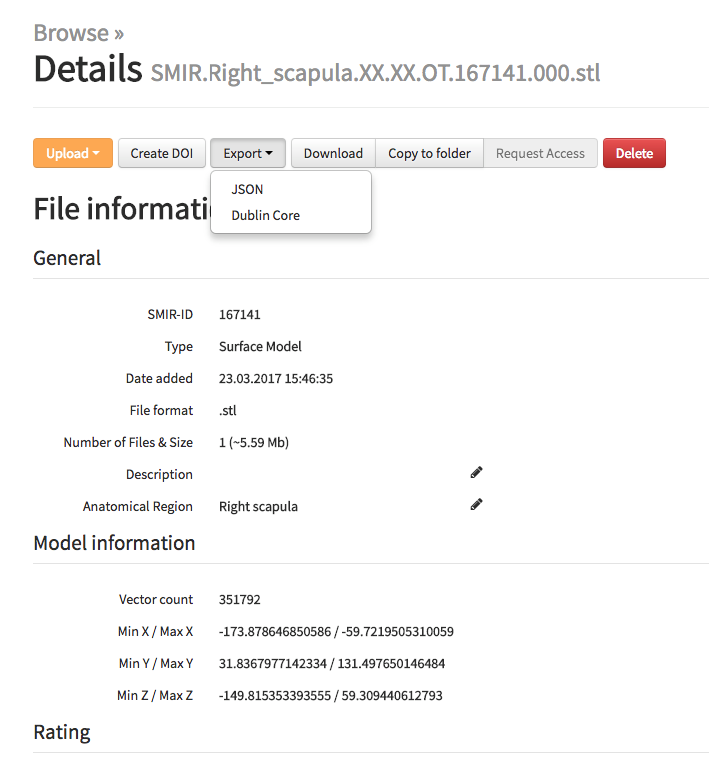
Data sets are represented as Objects on SMIR. Each object has a unique ID, a set of meta data and object permission. The object's ID is static. This allows you to link permanently to an object. Additionaly, SMIR offers to create a Digital object identifier (DOI). Please read the DOI section for details and instructions.
Link template
https://www.smir.ch/Objects/ID
Example for ID 101597
https://www.smir.ch/Objects/101597
There are different object types to represent the type of the data set. Example object types are:
- RAW Image like CT scan, MR Images, etc..
- Segementation of Images
- Surface models
- Genetic data
For a complete list check the technical documentation section.
Object names
SMIR uses a template to replace filenames after upload. This helps to identify what type of data the object represents by just looking at the name. It also removes identification information stored in the original (local) filename. The original filename is stored but only displayed to the owner of the object.
Naming template
Template Namespace.Anatomy.Age.Gender.Modality.ID.Filenumber.Extension
Example SMIR.Right_scapula.56.M.OT.167141.000.stl
- Namespace: SMIR
- Anatomy: Right scapula
- Age: 56
- Gender: male
- Modality: Other Type (OT)
- ID: 167141
- Extension: STereoLithography (stl)
Meta Data
General meta data
Type specific meta data
Export meta data
MMeta data of an object can be exported on the detail page. Available formats:
-
SMIR API (json)
-
Dublin core (xml)
DOI
Object permissions
Permission sets
Default permission
Owner change
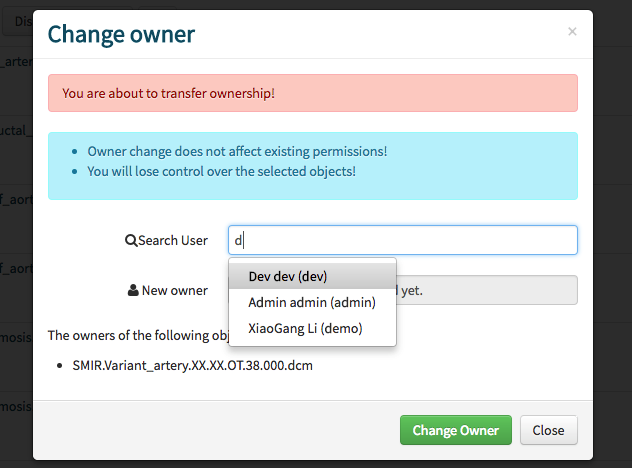
Ech object has exactly one owner. But the owner can change (transfer) the ownership of the object(s).
- Owner change does not affect existing permissions!
- You will lose control over the selected objects!
Single object
-
Open the Object's menu
-
Select
Change Owner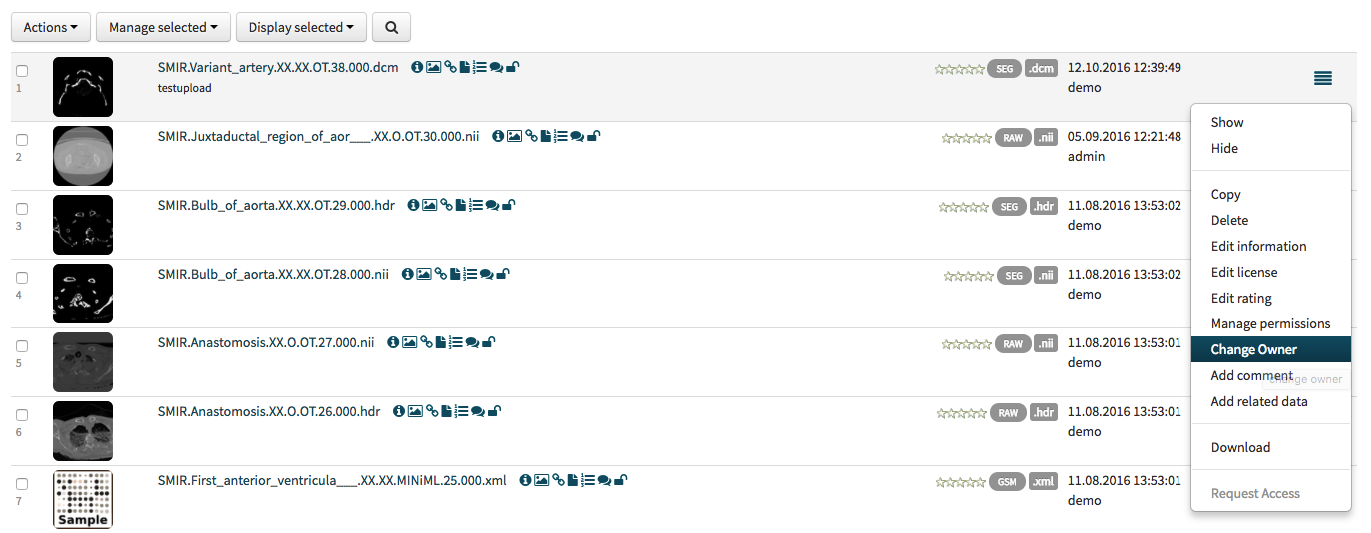
-
Search the new Owner and confirm the change in the modal to finish the process
Batch change
- Select multiple object using the checkboxes.
- Select
Ownerin the theManage selecteddrop-down menu
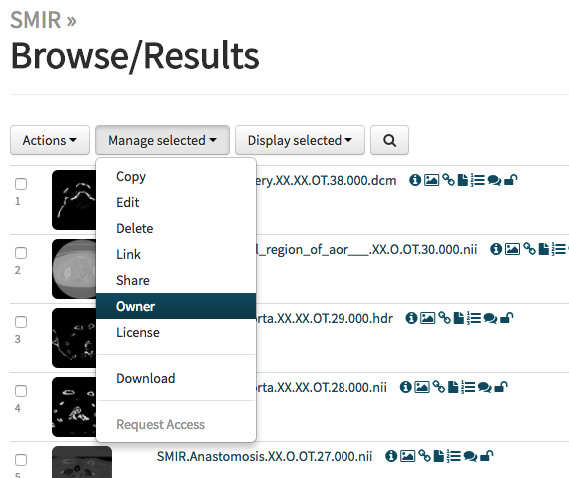
- Search the new Owner and confirm the change in the modal to finish the process
License
The license specifies the rights the user has after download whereas object permissions define the access to the file on SMIR.
A license is set for each object. Copyright is set as default. Please consider changing it when you prepare the object for publishing. The license file will be included in the download. A list of open source license are available. If you need a custom license please use the ticket system to send such a request.
Change license of a single object
The user can change the license in a object list view or on the object's detail page.
- Login
- Navigate to the object
- Click on the menu icon (list view)
- Select
Edit license - Select the license from the drop-down menu in the modal
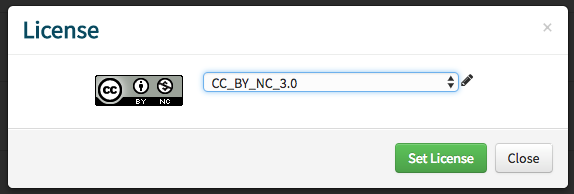
Set licenseto change orcancelto abort
Batch license change
- Login
- Select the object and click on
Manage selectedand thenLicense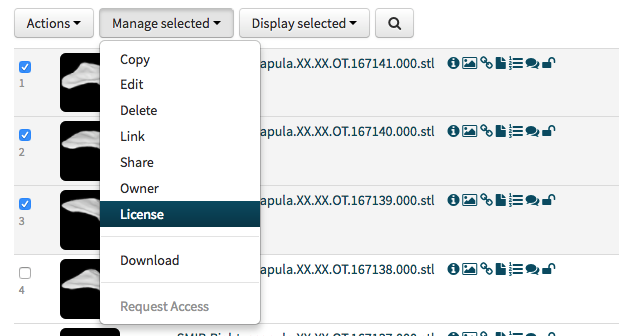
- Select the license from the drop-down menu in the modal
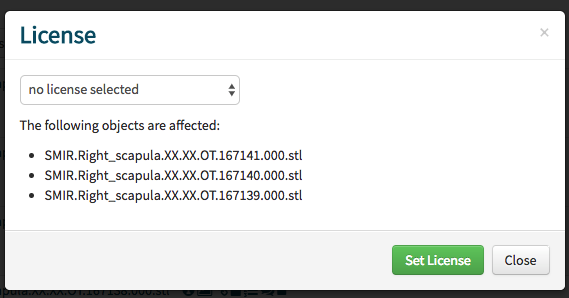
Set licenseto change/save orcancelto abort
Preview Images
SMIR generates for Images and model a set of up to 10 preview images to give a glance at the data set. Preview images are not part of the actual data you download.
Files
The actual data is not displayed/accessable on SMIR. To use the data set, download the object. However, the list of included files in an object is displayed.